Nessus
- 시스템 취약점 검사 툴로 서버에 어떤 서비스를 하고 있는지를 분석해 주는 프로그램이다.
- 서버와 클라이언트 구조로 되어 있다.
Nessus 구조
- nessus는 서버/클라이언트 구조를 갖는다.
서버에는 nessus 데몬과 플러그인이 설치되고, 클라이언트에는 nessus 서버를 통해 취약점을 발견할 수 있는 GUI 또는 명령어가 설치된다.
서버는 유닉스 계열만 가능하며, 클라이언트는 유닉스 계열이나 윈도우, Mac 등 여러가지 OS에서 사용 할 수 있다.
-------------------------------------------------------------------
http://www.nessus.org
Server - http://www.nessus.org/download/nessus_download.php
Red Hat ES 5 / CentOS 5
Nessus-3.2.1-es5.i386.rpm : (다운로드)
Client - http://www.nessus.org/download/index.php
Red Hat ES 5 / CentOS 5
NessusClient-3.2.1-es5.i386.rpm : (다운로드)
-------------------------------------------------------------------
1. Nessus Server
1-1. 다운 및 설치
| [root@server3 ~]# cd Desktop [root@server3 Desktop]# ls Nessus-3.2.1-es5.i386.rpm NessusClient-3.2.1-es5.i386.rpm [root@server3 Desktop]# mv Nessus-3.2.1-es5.i386.rpm /root [root@server3 Desktop]# cd .. [root@server3 ~]# ls Nessus-3.2.1-es5.i386.rpm NessusClient-3.2.1-es5.i386.rpm [root@server3 ~]# rpm -Uvh Nessus-3.2.1-es5.i386.rpm 준비 중... ########################################### [100%] 1:Nessus ########################################### [100%] nessusd (Nessus) 3.2.1. for Linux (C) 1998 - 2008 Tenable Network Security, Inc. Processing the Nessus plugins... [##################################################] All plugins loaded - Please run /opt/nessus//sbin/nessus-adduser to add an admin user - Register your Nessus scanner at http://www.nessus.org/register/ to obtain all the newest plugins - You can start nessusd by typing /sbin/service nessusd start [root@server3 ~]# whereis nessus nessus: /opt/nessus/bin/nessus |
1-2. 클라이언트에서 nessus 데몬에 접속하게 위한 유저계정을 생성한다.
| [root@server3 sbin]# pwd /opt/nessus/sbin [root@server3 sbin]# ls nessus-adduser nessus-chpasswd nessus-rmuser nessus-update-plugins nessus-check-signature nessus-mkcert nessus-update nessusd [root@server3 sbin]# ./nessus-adduser Using /var/tmp as a temporary file holder Add a new nessusd user ---------------------- Login : nessusadmin - 생성할 유저를 입력한다. Authentication (pass/cert) [pass] : pass - 인증 방식을 입력한다. Login password : - 암호를 입력한다. Login password (again) : User rules ---------- nessusd has a rules system which allows you to restrict the hosts that nessusadmin has the right to test. For instance, you may want him to be able to scan his own host only. Please see the nessus-adduser(8) man page for the rules syntax Enter the rules for this user, and hit ctrl-D once you are done : ctrl + d (the user can have an empty rules set) ------------------------------------------------------------------- - nessus 가 1. 스캔을 허용하거나 거부할 ip 대역을 입력한다. 설정을 완료한 후에는 ctrl + d 를 입력한다. accept or deny ip/netmask default accept or deny 2. 모든 ip 대역을 설정하려면 그냥 ctrl + d 를 입력하면 된다. ------------------------------------------------------------------- Login : nessusadmin Password : *********** DN : Rules : Is that ok ? (y/n) [y] y user added. |
1-3. Nessus Server 실행
| [root@server3 sbin]# ./nessusd -D - 서버 데몬 생성 nessusd (Nessus) 3.2.1. for Linux (C) 1998 - 2008 Tenable Network Security, Inc. Processing the Nessus plugins... [##################################################] All plugins loaded [root@server3 sbin]# ------------------------------------------------------------------- Nessus 를 실행하기 위해서는 activation code를 받아야 한다. http://www.nessus.org/plugins/?view=register-info - 이 페이지의 하단에 있는 HomeFeed FREE - non-professional usage only 를 선택 해서 메일 주소를 입력하면 무료로 activation code를 받을 수 있다. ------------------------------------------------------------------- 메일 수신 내용 Your activation code for the Nessus plugin feed is A7EE-52A0-1303-49BB-6B35 Linux and Solaris Users : ------------------------ To activate your account, simply execute the following command : /opt/nessus/bin/nessus-fetch --register A7EE-52A0-1303-49BB-6B35 - 리눅스와 솔라리스 유저를 위해 실행 명령어가 적혀있다. ------------------------------------------------------------------- [root@server3 sbin]# /opt/nessus/bin/nessus-fetch --register A7EE-52A0-1303-49BB-6B35 Your activation code has been registered properly - thank you. Now fetching the newest plugin set from plugins.nessus.org... Your Nessus installation is now up-to-date. If auto_update is set to 'yes' in nessusd.conf, Nessus will update the plugins by itself. [root@server3 sbin]# ./nessusd start - nessusd 서비스를 실행한다. nessusd (Nessus) 3.2.1. for Linux (C) 1998 - 2008 Tenable Network Security, Inc. Processing the Nessus plugins... [##################################################] All plugins loaded - 이렇게 나오고 커서가 계속 깜박이면 서비스가 제대로 실행된 것이다. - 참고 실행한 터미널 창을 닫으면 nessusd 서비스가 자동으로 종료되므로 서비스 중에는 창을 닫지 않는다. 백그라운드 실행도 되지 않는다. |
2. Nessus Client
2-1. 다운 및 설치
| [root@server3 expat-2.0.1]# cd /root/Desktop [root@server3 Desktop]# ls Nessus-3.2.1-es5.i386.rpm NessusClient-3.2.1-es5.i386.rpm [root@server3 Desktop]# mv NessusClient-3.2.1-es5.i386.rpm /root [root@server3 Desktop]# cd .. [root@server3 ~]# ls Nessus-3.2.1-es5.i386.rpm NessusClient-3.2.1-es5.i386.rpm [root@server3 ~]# rpm -Uvh NessusClient-3.2.1-es5.i386.rpm 준비 중... ########################################### [100%] 1:NessusClient ########################################### [100%] [root@server3 ~]# whereis NessusClient NessusClient: /opt/nessus/bin/NessusClient |
2-2. Nessus Client 실행
| [root@server3 ~]# cd /opt/nessus/bin/ [root@server3 bin]# ls NessusClient nessus nessus-fetch nessus-mkrand nasl nessus-bug-report-generator nessus-mkcert-client nessuscmd [root@server3 bin]# ./NessusClient - nessus 클라이언트 실행 |
2-3. Nessus Client 설정

Connect 클릭 -> "+" 를 클릭한다.

Connection name : 분석하고자 하는 IP를 입력한다.
Host name : 호스트 이름을 입력한다.
Port : 1241 (Default)
Login / Password : 생성한 유저와 패스워드를 입력한다.
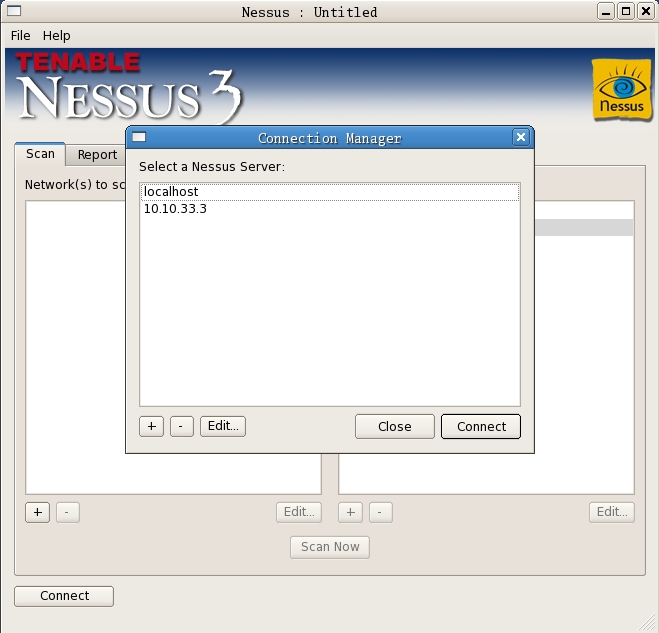
추가한 10.10.33.3 을 선택한 다음 edit 를 클릭한다.

save를 하고 10.10.33.3 을 선택한 다음 connect 를 클릭한다.

Default scan policy 를 선택한 다음 edit 를 클릭한다.

Plugin Selection 를 선택해서 scan 할 대상을 추가하거나 삭제하고 save 를 클릭한다.

scan now 를 클릭한다.

scan 결과는 report를 통해 확인할 수 있다.
'Linux > 보안' 카테고리의 다른 글
| 문서 암호화/복호화 - Gnupg (0) | 2009.02.05 |
|---|---|
| 트래픽 모니터링 프로그램 - bandwidthd (0) | 2009.02.04 |
| 보안 체킹 프로그램 - portsentry (0) | 2009.02.04 |
| 백신 프로그램 - avast (0) | 2009.02.04 |
| 백신 프로그램 - antivir (0) | 2009.02.04 |
| 보안 체킹 프로그램 - Nmap - port scanning (0) | 2009.02.03 |
